redhead_jesss
Active Wheeler
- Joined
- Mar 27, 2024
- Messages
- 111
- Reaction score
- 99
Hey everyone! So I just installed the new Leitner Designs GateKEEPER on the truck and while Leitner provides some great instructions for their installs, I thought I would make a step by step install guide with some pictures and any additional notes or tips. This is specifically for the ACS Forged rack on the 4th gen Tacoma (there unfortunately is not an option for the original ACS rack and only fits the Forged. However it’s a universal fit otherwise so it can be lengthened to fit other trucks with the ACS Forged rack as well)
https://alnk.to/3J7Xard
So starting off I always like to double check that I have all the hardware and tools needed.
Tools needed:
Torque Wrench
T30 & T40 Torx bit socket
10MM & 13MM wrench
Hardware provided:
(6) M8 x 20, (6) M8 Locknut, (4) M8 x 14, (4) drop in nuts, (4) M6 x 20, (4) M6 Flang nut, (2) M8 x25, (2) M8 x 50, (2) Long spacers, (2) Short spacers, (2) brackets, (2) latches, (2) panels


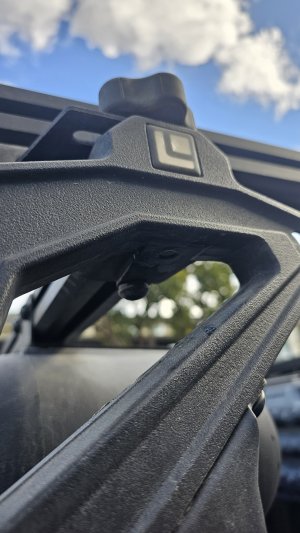
-Start by removing the bolt pictured below from both sides of the rack (you will no longer need this bolt as it will be replaced with the (2) M8 x 25 bolts provided).

-After removing the bolt on each side, begin installing the mounting brackets with the M8 x 25 bolts along with the LONG spacer provided (the short spacer is not needed) and the (2) M8 x 50 bolts provided. Torque to 16ft-lb. *see picture below**

-Next you will install the Lock catch on either end of the lower extrusion side railings using the (4) drop in nuts and the (4) M8 x 14 bolts—two of each for each side. Each lock latch is labeled Left or Right (Left side is Driver and Right is Passenger). Torque to 16ft-lb.

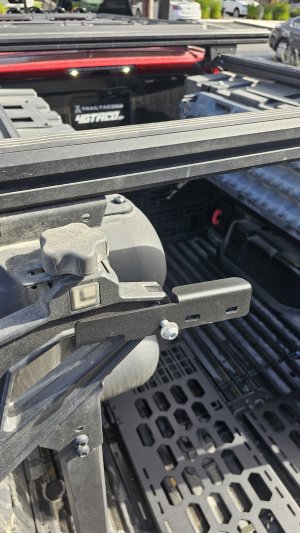
-From here, you will want to align your two Gatekeeper panels to line up with the brackets installed. I was installing this alone so I held up the gatekeeper panels to the holes on the brackets and made sure the spacing on either end was centered. I also used the two bolts visible through the cut outs on the gate keeper to further center the panels. (circled in photo below). **You could also just use a tape measurer but I struggled to measure and hold up the panels on my own so I resorted to this route.

-After making sure that the gate panels are centered, you can then secure it in place with the (6) M8 x 20 bolts provided along with your T40 Torx and 13MM wrench, making sure to put them in the furthest slots (two on the top lip, two on the top of the edge of the panels, and two on the bottom edge). I tightened these enough to keep the panels together and shifting too much but still left it loose enough that I could make adjustments after mounting to the brackets if needed.

-From here I mounted the GateKeeper to the rack using the (4) M6x20 bolts provided and the T30 Torx and 10MM wrench.
**Before fully tightening all the bolts down, I made sure the latch was able to fully engage and once I confirmed that it was in the correct position to do so, I tightened down all the bolts on the gatekeeper.
-Last and final step after everything is tightened down is to stand back and admire the GateKEEPER

Super excited to use this especially with the RTT mounted. I can’t express the number of times we have been traveling and wanted to make a quick grocery stop etc. only for someone to have to stay back with the truck to make sure no one grabbed anything from the bed of the truck. This is definitely a great deterrent!
Let me know what you guys think and is this something that you would add to your build?! And for those wanting to order one, use code REDHEADJESS10 and that will get ya a discount!
https://alnk.to/3J7Xard
So starting off I always like to double check that I have all the hardware and tools needed.
Tools needed:
Torque Wrench
T30 & T40 Torx bit socket
10MM & 13MM wrench
Hardware provided:
(6) M8 x 20, (6) M8 Locknut, (4) M8 x 14, (4) drop in nuts, (4) M6 x 20, (4) M6 Flang nut, (2) M8 x25, (2) M8 x 50, (2) Long spacers, (2) Short spacers, (2) brackets, (2) latches, (2) panels
-Start by removing the bolt pictured below from both sides of the rack (you will no longer need this bolt as it will be replaced with the (2) M8 x 25 bolts provided).
-After removing the bolt on each side, begin installing the mounting brackets with the M8 x 25 bolts along with the LONG spacer provided (the short spacer is not needed) and the (2) M8 x 50 bolts provided. Torque to 16ft-lb. *see picture below**
-Next you will install the Lock catch on either end of the lower extrusion side railings using the (4) drop in nuts and the (4) M8 x 14 bolts—two of each for each side. Each lock latch is labeled Left or Right (Left side is Driver and Right is Passenger). Torque to 16ft-lb.
-From here, you will want to align your two Gatekeeper panels to line up with the brackets installed. I was installing this alone so I held up the gatekeeper panels to the holes on the brackets and made sure the spacing on either end was centered. I also used the two bolts visible through the cut outs on the gate keeper to further center the panels. (circled in photo below). **You could also just use a tape measurer but I struggled to measure and hold up the panels on my own so I resorted to this route.
-After making sure that the gate panels are centered, you can then secure it in place with the (6) M8 x 20 bolts provided along with your T40 Torx and 13MM wrench, making sure to put them in the furthest slots (two on the top lip, two on the top of the edge of the panels, and two on the bottom edge). I tightened these enough to keep the panels together and shifting too much but still left it loose enough that I could make adjustments after mounting to the brackets if needed.
-From here I mounted the GateKeeper to the rack using the (4) M6x20 bolts provided and the T30 Torx and 10MM wrench.
**Before fully tightening all the bolts down, I made sure the latch was able to fully engage and once I confirmed that it was in the correct position to do so, I tightened down all the bolts on the gatekeeper.
-Last and final step after everything is tightened down is to stand back and admire the GateKEEPER
Super excited to use this especially with the RTT mounted. I can’t express the number of times we have been traveling and wanted to make a quick grocery stop etc. only for someone to have to stay back with the truck to make sure no one grabbed anything from the bed of the truck. This is definitely a great deterrent!
Let me know what you guys think and is this something that you would add to your build?! And for those wanting to order one, use code REDHEADJESS10 and that will get ya a discount!
Attachments
Last edited: